Configuring Ethernet Port Groups
The Ethernet Groups table lets you configure Ethernet Groups. An Ethernet Group represents a physical Ethernet port(s) on the device. You can assign an Ethernet Group with one, two, or no ports (members). When two ports are assigned to an Ethernet Group, 1+1 Ethernet port redundancy can be implemented in your network. This provides port redundancy within the Ethernet Group, whereby if a port is disconnected the device switches over to the other port in the Ethernet Group. If you configure an Ethernet Group with only one port, the Ethernet Group operates as a single port (no redundancy).
The Ethernet Groups table lets you configure the transmit (Tx) and receive (Rx) settings of the Ethernet ports per Ethernet Group. The Tx/Rx setting is applicable only to Ethernet Groups that contain two ports. This setting determines if both ports or only one of the ports can receive and transmit traffic.
The maximum number of Ethernet Groups that you can configure is the same as the number of Ethernet ports provided by the device. Thus, the device supports up to
You can assign Ethernet ports to IP network interfaces. This is done by first configuring an Ethernet Device with the required Ethernet Group containing the port or ports (see Configuring Underlying Ethernet Devices). Then by assigning the Ethernet Device to the IP network interface in the IP Interfaces table (see Configuring IP Network Interfaces). This enables physical separation of network interfaces, providing a higher level of segregation of sub-networks. Equipment connected to different physical ports is not accessible to one another; the only connection between them can be established by cross connecting them with media streams (VoIP calls).
| ● | When |
| ● | If you want to assign a port to a different Ethernet Group, you must first remove the port from its current Ethernet Group. To remove the port, configure the 'Member' field so that no port is selected or select a different port. |
| ● |
|
| ● | When implementing 1+1 Ethernet port redundancy, each port in the Ethernet Group (port pair) must be connected to a different switch (but in the same subnet). |
The following procedure describes how to configure Ethernet Groups through the Web interface. You can also configure it through ini file [EtherGroupTable] or CLI (configure network > ether-group).
| ➢ | To configure Ethernet Groups: |
| 1. | Open the Ethernet Groups table (Setup menu > IP Network tab > Core Entities folder > Ethernet Groups). |
| 2. | Select the Ethernet Group that you want to configure, and then click Edit; the following dialog box appears: |
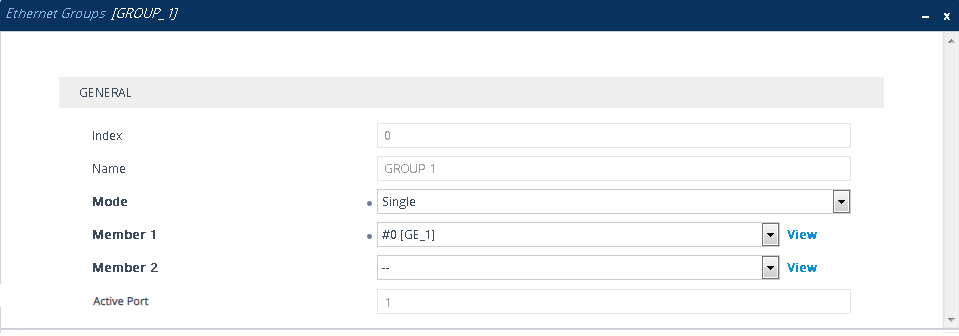
| 3. | Configure the Ethernet Group according to the parameters described in the table below. |
| 4. | Click Apply, and then restart the device with a save-to-flash for your settings to take effect. |
Ethernet Groups Table Parameter Descriptions
|
Parameter |
Description |
|||||||||||||||||||||
|---|---|---|---|---|---|---|---|---|---|---|---|---|---|---|---|---|---|---|---|---|---|---|
|
'Index' |
(Read-only) Displays the index number for the table row. |
|||||||||||||||||||||
|
'Name' group [EtherGroupTable_Group] |
(Read-only) Displays the Ethernet Group number. |
|||||||||||||||||||||
|
'Mode' mode [EtherGroupTable_Mode] |
Defines the mode of operation of the ports in the Ethernet Group. This applies only to Ethernet Groups containing two ports.
Note:
For more information on Ethernet Group settings for HA, see Network Topology Types and Rx/Tx Ethernet Port Group Settings. |
|||||||||||||||||||||
|
'Member 1' member1 [EtherGroupTable_Member1] |
Assigns the first port to the Ethernet Group. To assign no port, set this field to NONE. Note: Before you can re-assign a port to a different Ethernet Group, you must first remove the port from its current Ethernet Group. To remove the port, either set this field to NONE or to a different port. |
|||||||||||||||||||||
|
'Member 2' member2 [EtherGroupTable_Member2] |
Assigns the second port to the Ethernet Group. To assign no port, set this field to NONE. Note: Before you can re-assign a port to a different Ethernet Group, you must first remove the port from its current Ethernet Group. To remove the port, either set this field to NONE or to a different port. |
|||||||||||||||||||||
|
'Active Port' |
(Read-only) Displays the currently active port of the Ethernet Group. If the 'Mode' is SINGLE, the field displays the name of the active port. |